
User Manual
User Manual
This guide covers hands-on wiring and Web configuration, from initial setup to peripheral configuration, PeriphExec rules, sensor integration, import/export and troubleshooting.
1. Preparation
Before starting, complete these prerequisites:
- Choose firmware edition: Select Lite/Standard/Full based on chip and feature requirements. See Edition Comparison for full comparison.
- Flash firmware: Use the deploy script to flash matching LittleFS filesystem and firmware. See Deploy, Flash & Test.
- Initial configuration: Connect to device AP → enter Web console → configure WiFi → confirm network online → configure MQTT. See Network Config and MQTT Config for step-by-step instructions.
For the full quick-start steps, see Quick Start.
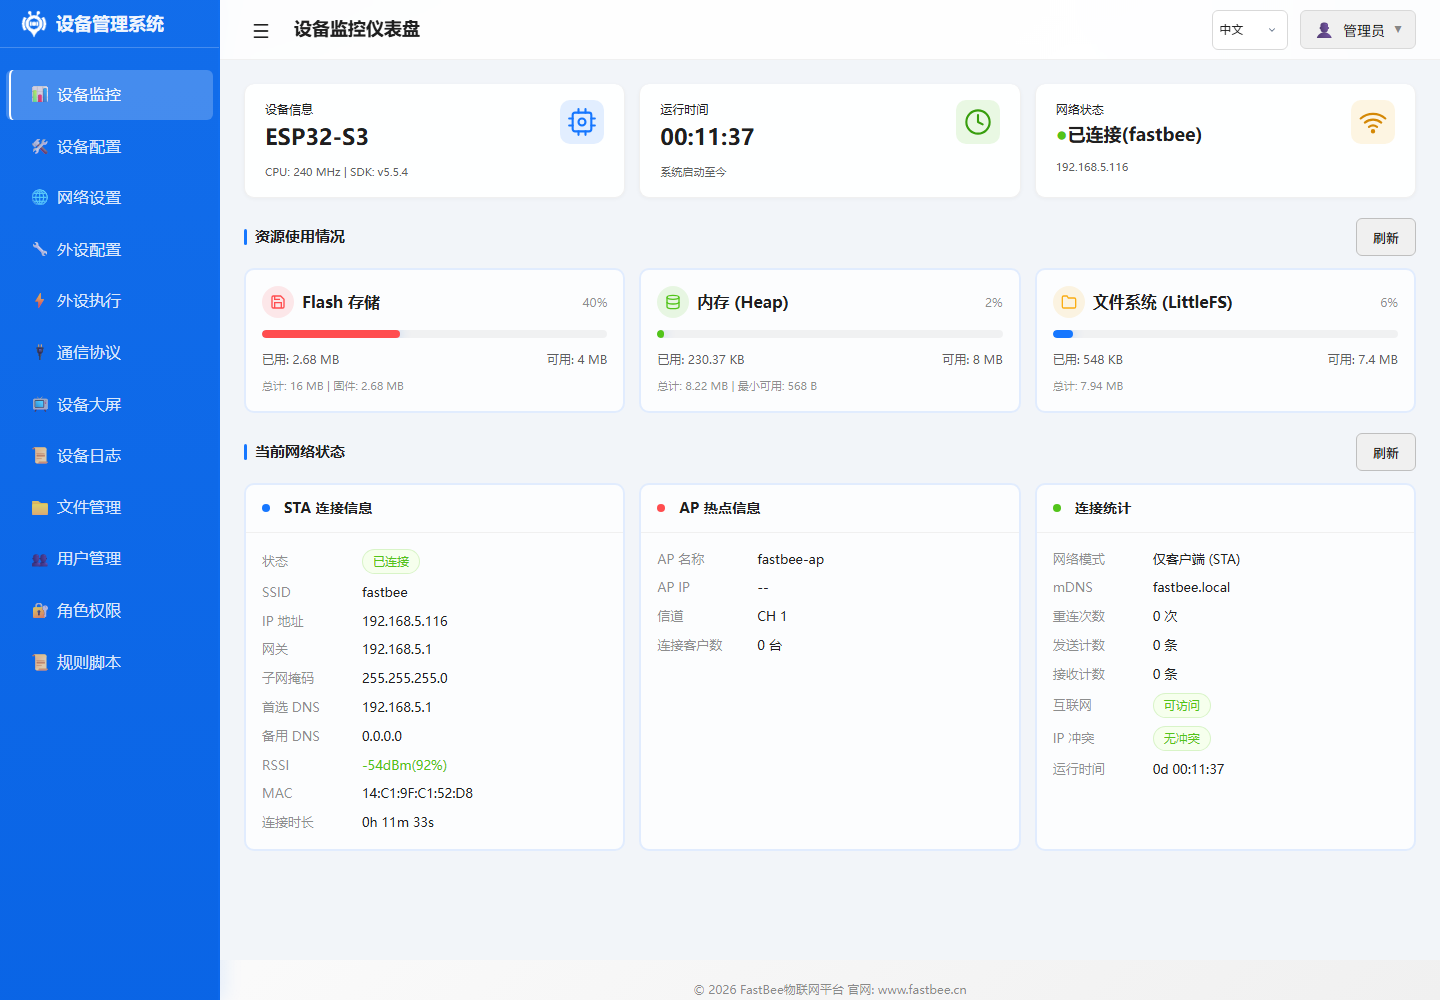
After deployment, the browser Web console should show the dashboard with device data.
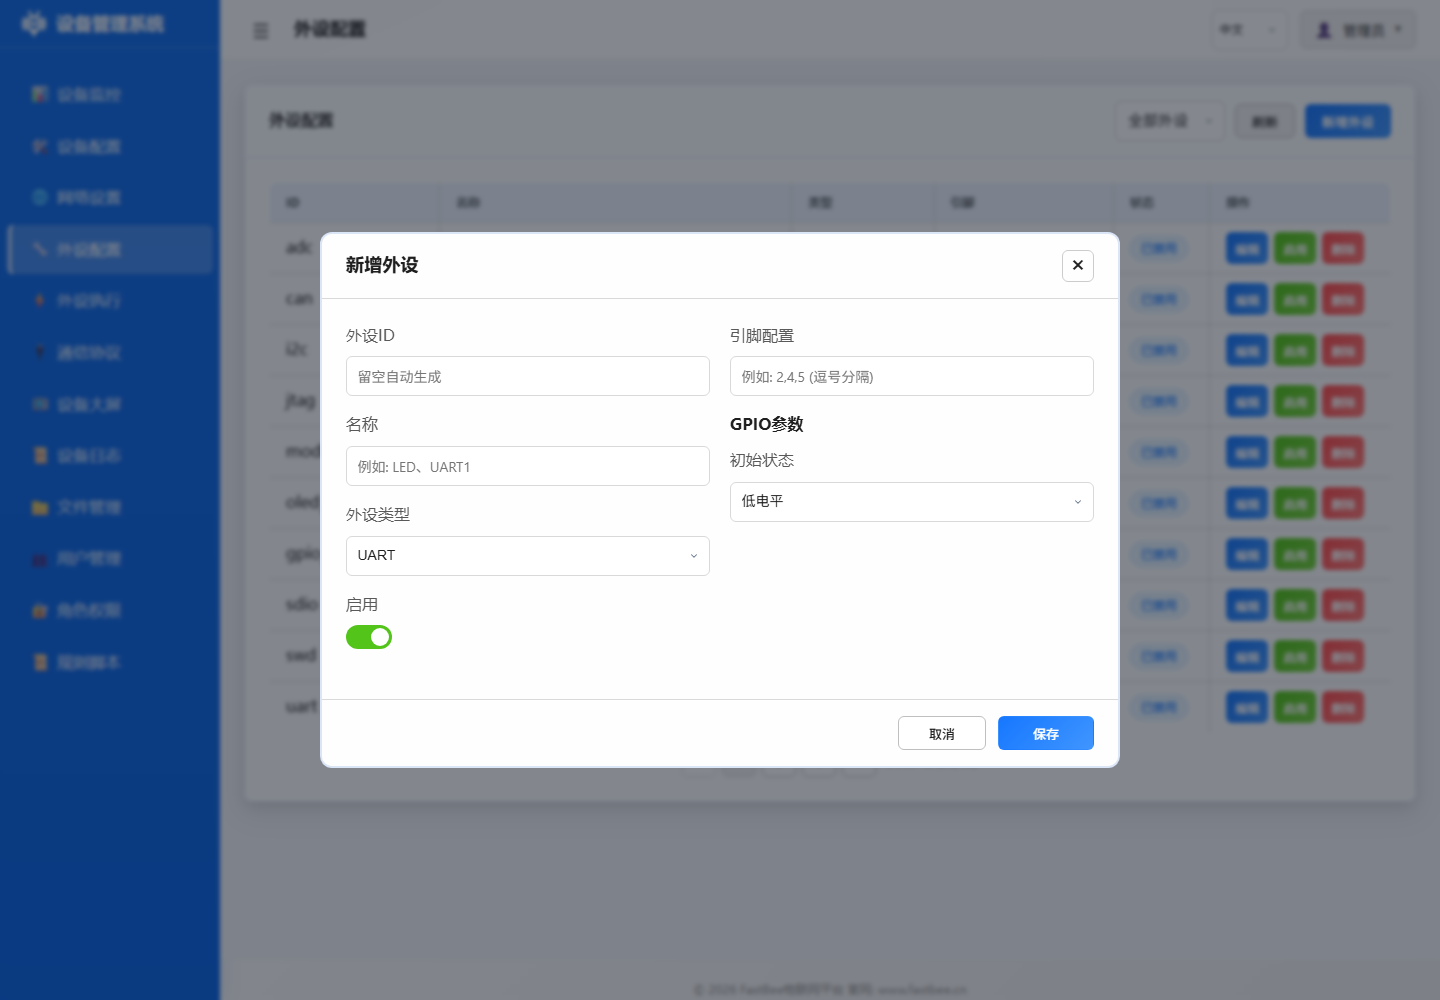
2. Peripheral Configuration
The peripheral config file is at data/config/peripherals.json. Each peripheral requires at minimum:
{
  "id": "relay_01",
  "name": "Relay 1",
  "type": 12,
  "enabled": false,
  "pinCount": 1,
  "pins": [26, 255, 255, 255, 255, 255, 255, 255],
  "params": {}
}
Quick type reference:
| Type | type | Common Modules |
|---|---|---|
| I2C | 2 | SHT31, AHT20, BH1750, OLED, BMP280, MPU6050 |
| GPIO Input | 11/13/14 | Button, PIR, vibration, reed switch, digital obstacle |
| GPIO Output | 12 | LED, relay, buzzer, laser |
| ADC | 15/26 | Photoresistor, soil moisture, smoke, rain, voltage, current |
| SENSOR | 38 | DHT, HC-SR04, generic sensor placeholder |
| ONE_WIRE | 44 | DS18B20 |
| NeoPixel | 45 | WS2812B |
| TM1637 | 47 | 4-digit display |
| Modbus Device | 51 | RS485 slave control (Standard/Full) |
| DEVICE_EVENT | 60 | Logical event source |
Complete peripheral type enumeration, pin assignment rules and configuration flow are detailed in the Peripheral Guide.
Best practice: Save new peripherals as disabled first; enable after confirming pins and power supply. If a saved peripheral doesn't work at runtime, verify that the page fields, peripherals.json, runtime driver and rule references all use the same peripheral ID.
3. PeriphExec Rules
The PeriphExec file is at data/config/periph_exec.json. A rule consists of triggers and actions:
{
  "id": "exec_temp_relay",
  "name": "High temp opens relay",
  "enabled": false,
  "triggers": [
    {
      "triggerType": 4,
      "eventId": "ds:dht11_01_temperature",
      "operatorType": 2,
      "compareValue": "35"
    }
  ],
  "actions": [
    {
      "targetPeriphId": "relay_01",
      "actionType": 0,
      "actionValue": "",
      "useReceivedValue": false,
      "syncDelayMs": 0,
      "execMode": 0
    }
  ],
  "reportAfterExec": true
}
Common triggers:
| triggerType | Name | Use Case |
|---|---|---|
| 0 | Platform | MQTT/platform command dispatch |
| 1 | Timer | Periodic collection, scheduled control |
| 4 | Event | Button, data source threshold, system event |
| 5 | Poll | Local data source condition check; Modbus polling requires Standard/Full |
Common actions:
| actionType | Name | Use Case |
|---|---|---|
| 0/1 | GPIO High/Low | Relay, LED, buzzer |
| 2/3 | Blink/Breathe | LED, buzzer indication |
| 4/5 | PWM/DAC | Dimming, speed control, analog output |
| 10 | Call Peripheral | Stepper, NeoPixel, UART composite |
| 15 | Command Script | Multi-step GPIO/PWM/delay (Standard/Full) |
| 19 | Sensor Read | ADC, DHT, DS18B20, HC-SR04, SHT31, etc. |
| 21 | Trigger Event | Send logical event to platform or local rules |
| 24/25/26/27 | Display | TM1637, OLED display actions |
Complete trigger/action type tables, condition operators and platform trigger fields are in the PeriphExec Guide.
Best practice: Keep rules disabled on first deploy; use "Execute Once" to observe logs and peripheral state before enabling. Before enabling, confirm: unique ID, clear trigger source, valid action target peripheral, logging and rollback available.
4. Sensor Read Action
actionType: 19 uses a JSON string to describe the read parameters. The Web form auto-generates this:
{
  "periphId": "sht31_i2c",
  "sensorCategory": "SHT31",
  "dataField": "temperature",
  "sensorLabel": "Temperature",
  "unit": "C",
  "decimalPlaces": 1,
  "driverParams": {
    "addr": "0x44",
    "sda": 21,
    "scl": 22
  }
}
Common sensorCategory values: dht11/dht22 (temp/humidity), ds18b20 (temperature), ultrasonic (distance), SHT31/AHT20 (I2C temp/humidity), BH1750 (I2C illuminance), BMP280 (I2C pressure, Standard/Full), MPU6050 (I2C gyro, Standard/Full).
Complete sensor categories and register-level config parameters are in the Sensor Guide.
5. Typical Scenarios
All scenarios follow the closed loop: Sense → Decide → Act → Report → Review. Start with a single sensor, single rule, single action; combine display, alarm and platform reporting after confirmation. More examples are in Examples.
Temperature Threshold Relay
- Configure DHT11/DHT22/SHT31/AHT20.
- Create timer collection rule with
reportAfterExec: true. - Create event trigger rule using
eventId: ds:<peripheralID>_<field>. - Action: relay HIGH or LOW depending on module effective level.
Low Light Auto-On
- Configure BH1750 or photoresistor ADC.
- Timer read
illuminanceorvoltage. - Event trigger
operatorType: 3(less than), e.g., value50. - Action: turn on relay or LED.
Current Overload Cutoff
- Configure ACS712 current sensor ADC.
- Sensor read advanced params:
sensitivity,zeroOffset,vRef,adcMax. - Event trigger:
current > 15. - Action: close relay, optionally trigger
actionType: 21to reportover_currentevent.
Modbus Sensor Collection (Standard/Full)
- Use
esp32-F4R0,esp32s3-F8R0or Full firmware. - Configure serial port, baud rate and slave addresses in Protocol / Modbus RTU.
- Add Modbus sub-devices or register mappings.
- Use poll trigger or Modbus action in PeriphExec to read data and report via MQTT.
6. Import/Export
- All documentation examples default to
enabled: false; verify pins before enabling after import. - Export
peripherals.jsonandperiph_exec.jsonbefore every batch modification. - Importing Full-edition configs into Lite/Standard ignores advanced feature fields; Lite does not support Modbus, Command Script, RuleScript or OTA rules.
- I2C devices can share SDA/SCL, but addresses must not conflict.
- GPIO6-GPIO11 are typically connected to Flash — do not use as peripheral pins.
- GPIO34-GPIO39 are input-only — suitable for ADC/digital input, not relay output.
Detailed pin assignment rules and hardware constraints are in the Peripheral Guide.
Recommended workflow: backup before every change, validate JSON before import, verify with dashboard, logs and feature pages after import.
7. Field Deployment Checklist
Before field deployment, verify each item:
| Item | Confirm |
|---|---|
| Firmware edition | -Env matches chip model and tier |
| Network config | WiFi SSID/password correct, or Ethernet/4G configured |
| MQTT connection | Server, port, ClientID, credentials filled; connection test returns connected |
| Peripherals enabled | Pins verified, enabled one-by-one, dashboard status confirmed |
| Rules validated | Rules disabled first → "Execute Once" to verify → enable after confirmation |
| Config backup | Exported peripherals.json and periph_exec.json backup |
| Smoke test | Ran smoke-test-device.ps1 confirming basic API pass |
8. Troubleshooting
| Symptom | Check |
|---|---|
| Web page loads but peripheral no action | Peripheral enabled? Correct pins? Relay effective level inverted? |
| Sensor reading empty | Collection rule enabled? periphId exists? Sample interval too short? |
| I2C sensor init fail | SDA/SCL swapped? Correct address? Pull-up resistors? 3.3V power? |
| ADC value abnormal | Exceeds 3.3V? Need voltage divider? ADC attenuation/calibration correct? |
| Threshold rule not triggering | Confirm collection rule generates ds:<id>_<field> data source first |
| MQTT test fails | Confirm network online first, then check server, port, ClientID, credentials, topic |
| Ethernet/4G menu unavailable | Confirm firmware is Full or custom switch enabled; Lite/Standard disables these |
| Modbus unavailable | Lite disables Modbus; switch to esp32-F4R0, esp32s3-F8R0 or Full |
fastbee.local unreachable | Confirm PC and device on same LAN; use router-assigned IP instead |
| No language switch | Lite/Standard default single language; full multilingual only in Full |
For detailed error codes and field recovery procedures, see the Stability & Release Checklist.