
开发
开发
本文档面向希望扩展 FastBee-Arduino 功能的开发者,涵盖开发环境搭建、编码规范、测试流程、扩展开发和贡献指南。
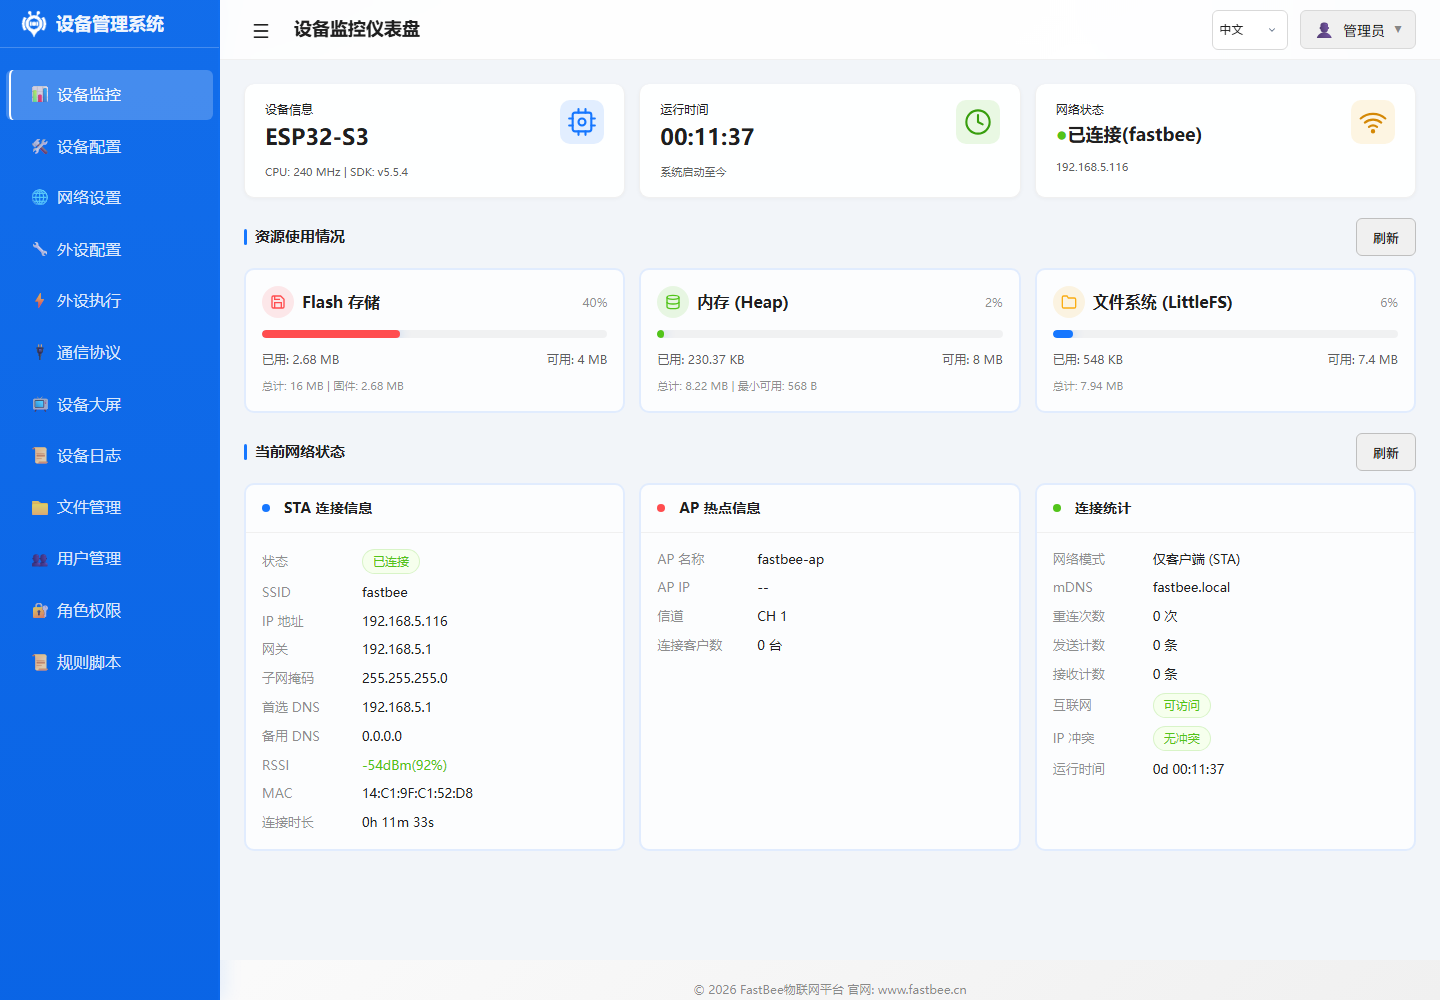
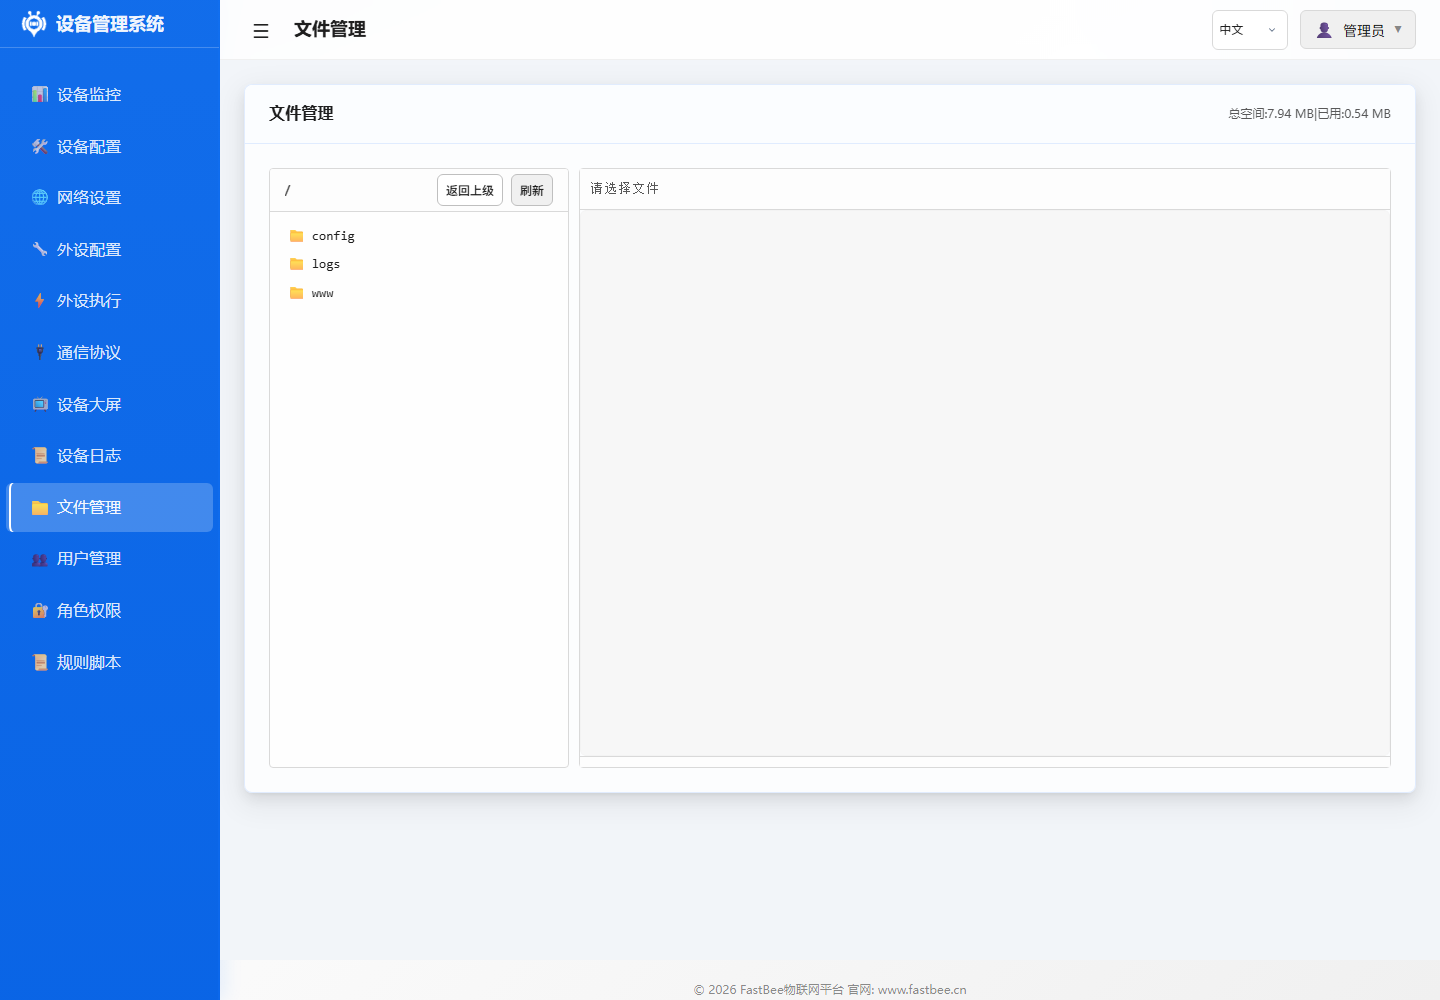
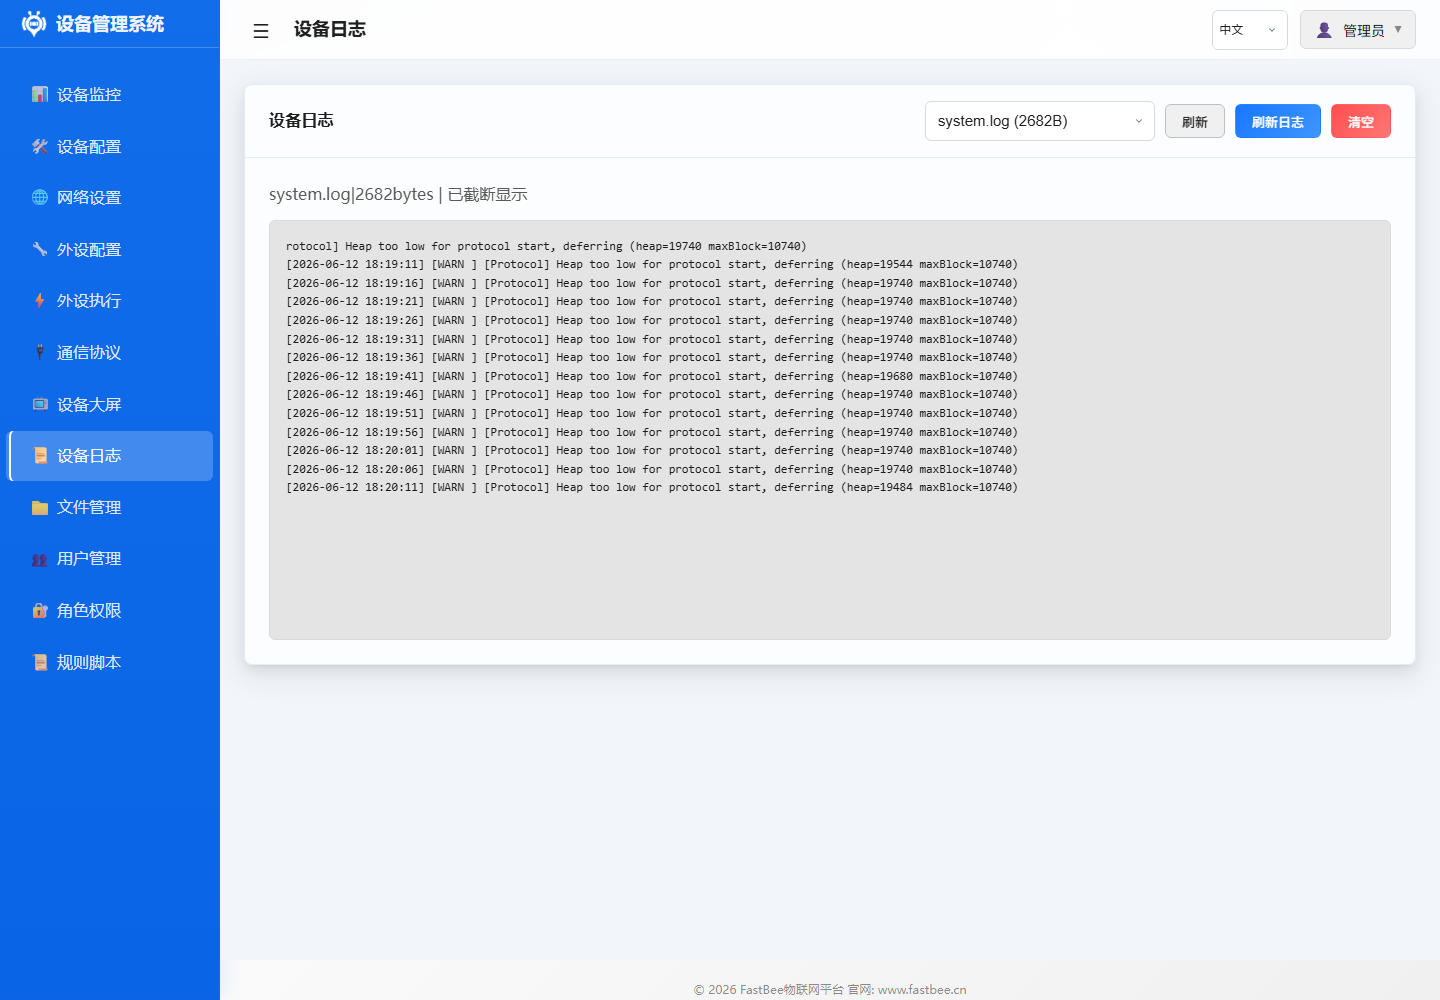
开发调试时,先通过仪表盘确认固件在线和资源余量,再用文件、日志、外设和外设执行页面核对配置和行为。下面几张实机截图是扩展开发后最常用的验证入口。


扩展开发完成后,按产物地图检查源码、配置、Web 资源、构建环境和设备验证记录是否同步,避免只更新固件而遗漏 LittleFS 或发布说明。

开发者建议先看架构和核心框架,再进入具体外设、协议或外设执行模块;改动完成后回到测试和发布路径做验证闭环。
开发环境搭建
必需工具
| 工具 | 版本 | 用途 |
|---|---|---|
| VSCode | 最新版 | 推荐 IDE |
| PlatformIO IDE | 最新版 | 嵌入式开发插件 |
| ESP32 开发板 | ESP32/C3/S3 | 硬件调试 |
| USB 数据线 | 支持数据传输 | 烧录和串口调试 |
可选工具
| 工具 | 用途 |
|---|---|
| PlatformIO Core (CLI) | 命令行构建 |
| Node.js 16+ | Web 资源构建 |
| Git | 版本控制 |
| 串口调试工具 | PuTTY/MobaXterm |
| MQTT 客户端 | MQTT Explorer/MQTTX |
克隆项目
git clone https://gitee.com/beecue/fastbee-arduino.git
cd FastBee-Arduino
VSCode 配置
- 安装 PlatformIO IDE 插件
- 打开项目文件夹
- PlatformIO 自动下载依赖 (首次需几分钟)
- 确认
.vscode/c_cpp_properties.json已生成
项目结构
目录说明详见 项目目录与文件说明。简要结构:
FastBee-Arduino/
├── src/          # C++ 源码(core/network/peripherals/protocols/security/systems/utils)
├── include/      # 头文件(与 src 结构对应)
├── web-src/      # Web 前端源码
├── data/         # 默认配置和构建后 Web 产物
├── scripts/      # 构建、部署和测试脚本
├── test/         # native 单元测试
├── docs/         # 项目文档
└── platformio.ini # PlatformIO 构建配置
编码规范
C++ 代码规范
命名约定:
| 类型 | 规范 | 示例 |
|---|---|---|
| 类名 | PascalCase | PeripheralManager |
| 方法名 | camelCase | initHardware() |
| 成员变量 | m_ + camelCase | m_peripherals |
| 常量 | UPPER_SNAKE_CASE | MAX_PERIPHERALS |
| 枚举值 | UPPER_SNAKE_CASE | ACTION_HIGH |
| 局部变量 | camelCase | sensorValue |
| 命名空间 | 小写 | fastbee::core |
代码格式:
- 遵循
.clang-format配置 - 缩进: 4 空格
- 大括号: K&R 风格 (开括号不换行)
- 行宽: 120 字符
示例:
class PeripheralManager {
public:
    bool addPeripheral(const PeripheralConfig& config);
    void initHardware();

private:
    std::map<std::string, Peripheral*> m_peripherals;
    bool m_initialized = false;
    static const int MAX_PERIPHERALS = 32;
};注释规范:
- 文件头: 简要说明文件职责
- 类/方法: Doxygen 风格
- 复杂逻辑: 行内注释说明原因
- 公开 API: 完整参数/返回值说明
/**
 * @brief 初始化外设硬件
 *
 * 根据配置分配引脚、初始化驱动,并注册到外设列表。
 *
 * @param config 外设配置
 * @return true 初始化成功
 * @return false 初始化失败 (引脚冲突/驱动异常)
 */
bool initHardware(const PeripheralConfig& config);
前端代码规范
命名约定:
- 变量/函数: camelCase
- 常量: UPPER_SNAKE_CASE
- 类名: PascalCase (如有)
代码格式:
- 遵循
.eslintrc.json配置 - 缩进: 4 空格
- 字符串: 单引号
- 分号: 必须
- 行宽: 120 字符
示例:
function loadPeripherals() {
    const apiUrl = '/api/peripherals';
    fetch(apiUrl)
        .then(response => response.json())
        .then(data => {
            renderPeripherals(data);
        })
        .catch(error => {
            console.error('加载外设失败:', error);
        });
}
构建流程
详细的构建、烧录和部署命令见 版本对比与部署验证。
# 编译固件(选择对应环境)
pio run -e esp32-F4R0
pio run -e esp32c3-F4R0
pio run -e esp32s3-F16R8

# 一键构建并烧录
powershell -ExecutionPolicy Bypass -File scripts\deploy.ps1 -Env esp32-F4R0 -Port COM6

# 仅构建 Web 资源
node scripts/gzip-www.js --env esp32-F4R0
测试流程
详细的测试分层、矩阵和用例见 测试与版本验证指南。
# 快速提交前检查
powershell -ExecutionPolicy Bypass -Command ".\scripts\test-all.ps1 -Checks static,build"

# 完整本地矩阵
powershell -ExecutionPolicy Bypass -Command ".\scripts\test-all.ps1 -Checks static,native,build,artifacts"

# 运行单个 native 测试
pio test -e native -f test_web_api
扩展开发
添加新外设
步骤 1: 定义外设类型
在 include/core/PeripheralTypes.h 添加类型枚举:
enum PeripheralType {
    // ... 现有类型
    YOUR_SENSOR_TYPE = 50,  // 选择未使用的值
};
步骤 2: 实现驱动类
在 src/peripherals/ 创建驱动文件:
YourSensorDriver.h:
#pragma once
#include "PeripheralTypes.h"

class YourSensorDriver {
public:
    bool begin(int pin, const std::map<std::string, String>& params);
    float readValue();
    void end();

private:
    int m_pin;
    bool m_initialized = false;
};YourSensorDriver.cpp:
#include "YourSensorDriver.h"
#include <Arduino.h>

bool YourSensorDriver::begin(int pin, const std::map<std::string, String>& params) {
    m_pin = pin;
    pinMode(m_pin, INPUT);
    m_initialized = true;
    return true;
}

float YourSensorDriver::readValue() {
    if (!m_initialized) return -1;
    return analogRead(m_pin);
}

void YourSensorDriver::end() {
    m_initialized = false;
}
步骤 3: 注册到 PeripheralManager
在 PeripheralManager::initHardware() 添加初始化逻辑:
case YOUR_SENSOR_TYPE: {
    auto* driver = new YourSensorDriver();
    if (!driver->begin(pins[0], config.params)) {
        delete driver;
        return false;
    }
    peripheral->setDriver(driver);
    break;
}
步骤 4: 添加传感器读取支持
在 PeriphExecExecutor::executeSensorRead() 添加解析逻辑:
if (sensorCategory == "your_sensor") {
    auto* driver = static_cast<YourSensorDriver*>(peripheral->getDriver());
    float value = driver->readValue();
    cache[key] = String(value);
    return true;
}
步骤 5: 编写文档
- 在
docs/peripherals/创建配置文档:your-sensor.md - 在
docs/examples/创建使用示例:49-your-sensor.md - 更新
docs/peripherals/sensor-guide-complete.md
步骤 6: 测试验证
- 连接硬件,烧录固件
- 通过 Web 界面添加外设
- 验证传感器读数正常
- 创建规则测试联动
添加新协议
步骤 1: 实现协议处理器
继承 ProtocolHandler 接口:
class YourProtocolHandler : public ProtocolHandler {
public:
    bool connect(const ProtocolConfig& config) override;
    bool disconnect() override;
    bool publish(const String& topic, const String& payload) override;
    bool subscribe(const String& topic) override;
    bool isConnected() override;

private:
    bool m_connected = false;
};
步骤 2: 注册到 ProtocolManager
在 ProtocolManager::initProtocol() 添加:
if (config.protocolType == "your_protocol") {
    auto* handler = new YourProtocolHandler();
    handler->connect(config);
    m_protocols[config.id] = handler;
}
步骤 3: 添加 API 路由
在 network/handlers/ 创建路由处理器:
YourProtocolRouteHandler.cpp:
void handleGetConfig(AsyncWebServerRequest* request) {
    // 返回协议配置
}

void handlePostConfig(AsyncWebServerRequest* request) {
    // 保存协议配置
}
注册到 WebConfigManager::setupRoutes():
server.on("/api/your-protocol", HTTP_GET, handleGetConfig);
server.on("/api/your-protocol", HTTP_POST, handlePostConfig);
步骤 4: 前端页面
- 在
web-src/pages/添加配置页面:your-protocol.html - 在
web-src/js/添加 API 调用逻辑 - 更新
web-src/modules/模块路由
步骤 5: 编写文档
- 在
docs/protocols/创建协议文档 - 更新
docs/protocols/README.md
贡献指南
提交 PR 流程
Fork 项目
- 在 Gitee/GitHub 上 Fork 仓库
创建特性分支
git checkout -b feature/your-feature-name提交更改
git add .
git commit -m "feat: add your feature description"
推送到分支
git push origin feature/your-feature-name开启 Pull Request
- 在项目仓库创建 PR
- 详细描述功能、测试情况、相关 issue
提交规范
| 类型 | 说明 | 示例 |
|---|---|---|
feat | 新功能 | feat: add BMP280 sensor driver |
fix | 修复 bug | fix: resolve MQTT reconnect issue |
docs | 文档更新 | docs: add architecture diagram |
style | 代码格式 | style: fix indentation |
refactor | 重构 | refactor: simplify peripheral init |
test | 测试相关 | test: add peripheral unit tests |
chore | 构建/工具 | chore: update platformio.ini |
代码审查要点
功能完整性:
- 功能是否按需求实现
- 边界条件是否处理
- 错误处理是否完善
内存安全性:
- 无内存泄漏 (new/delete 配对)
- 无缓冲区溢出
- 指针使用前检查 null
编译质量:
- 无编译警告
- 通过所有单元测试
- 遵循编码规范
文档同步:
- 更新相关文档
- 添加代码注释
- 更新 CHANGELOG (如有)
性能考虑:
- 避免频繁内存分配
- 使用引用传递大对象
- 异步处理耗时操作
调试技巧
串口日志
输出日志:
Serial.printf("[YOUR_MODULE] Message: %s\n", value.c_str());
Serial.printf("[YOUR_MODULE] Value: %d, Float: %.2f\n", intVal, floatVal);日志级别:
ESP_LOGE("TAG", "Error message");  // 错误
ESP_LOGW("TAG", "Warning message"); // 警告
ESP_LOGI("TAG", "Info message");    // 信息
ESP_LOGD("TAG", "Debug message");   // 调试
内存诊断
查看内存状态:
Serial.printf("Free heap: %lu bytes\n", ESP.getFreeHeap());
Serial.printf("Max alloc: %lu bytes\n", ESP.getMaxAllocHeap());
Serial.printf("Min free heap: %lu bytes\n", ESP.getMinFreeHeap());
PSRAM 状态:
#ifdef BOARD_HAS_PSRAM
    Serial.printf("PSRAM size: %lu bytes\n", ESP.getPsramSize());
    Serial.printf("Free PSRAM: %lu bytes\n", ESP.getFreePsram());
#endif
Web API 调试
浏览器开发者工具:
- 打开 Network 面板
- 查看 API 请求/响应
- 检查 JSON 格式
- 查看响应状态码
curl 测试:
# 获取外设列表
curl http://192.168.4.1/api/peripherals

# 添加外设
curl -X POST http://192.168.4.1/api/peripherals \
  -H "Content-Type: application/json" \
  -d '{"id":"test_01","name":"Test","type":12,"enabled":false,"pinCount":1,"pins":[26,255,255,255,255,255,255,255],"params":{}}'
常见问题排查
| 问题 | 排查步骤 |
|---|---|
| Web 无法访问 | 检查 WiFi 连接、IP 地址、防火墙 |
| 外设无响应 | 检查引脚配置、启用状态、接线 |
| MQTT 断连 | 检查服务器地址、端口、认证信息 |
| 内存不足 | 使用 slim 版、关闭不必要功能 |
| 编译失败 | 清理构建、检查依赖、更新 PlatformIO |
| 上传失败 | 检查 USB 连接、驱动、串口占用 |
性能分析
CPU 使用率:
uint32_t start = micros();
your_function();
uint32_t elapsed = micros() - start;
Serial.printf("Execution time: %lu us\n", elapsed);堆栈使用:
#include <esp_task.h>
Serial.printf("Stack high water: %lu bytes\n", uxTaskGetStackHighWaterMark(NULL));