EMQX installation
1. Installation options
There are many EMQX installation tutorials for Windows and Linux, so this page focuses on Docker deployment and FastBee-related EMQX 5 configuration.
2. Docker installation
Tips
Before running the container, create a bridge network if it does not already exist. It is used for communication between containers.
docker network create -d bridge fastbee-bridgeRun the following command to install EMQX 5.1:
docker run \
--name emqx \
--publish 1883:1883 \
--publish 8083:8083 \
--publish 8883:8883 \
--publish 8084:8084 \
--publish 18083:18083 \
--env TimeZone=Asia/Shanghai \
--volume /etc/localtime:/etc/localtime \
--restart unless-stopped \
--detach \
emqx:5.1
3. EMQX 5 configuration
FastBee needs EMQX HTTP authentication and Webhook configuration for client online/offline handling. There are two configuration methods:
- Configure them in
emqx.conf. A prepared configuration file is available underdocker/data/emqx/ect. - Open the EMQX dashboard through port
18083, then create client authentication, data bridge, and rule configuration.
EMQX accounts:
- Default dashboard account:
admin / public. - docker-compose deployment account configured in
emqx.conf:admin / admin123.
Tips
Accounts, HTTP authentication, Webhooks, and rules configured from the EMQX dashboard can be overwritten by matching settings in emqx.conf.
EMQX behavior:
- Changes made through Dashboard, HTTP API, or CLI are written to
data/configs/cluster.hoconat runtime and take effect immediately. - If the same configuration key is also defined with a different value in
etc/emqx.conf, the value frometc/emqx.conftakes effect after restart. - To avoid confusion, do not define the same configuration key in both
cluster.hoconandemqx.conf.
If any rule exists in emqx.conf, the device message forwarding rules should also be configured in emqx.conf.
3.1 Configure through file
Copy the following content into emqx.conf.
# Set dashboard port and default account.
dashboard {
    listeners.http {
        bind = 18083
    }
    default_username = "admin"
    default_password = "admin123"
}

# HTTP authentication.
authentication = [
  {
    mechanism = password_based
    backend = http
    enable = true
    method = post
    url = "http://177.7.0.13:8080/iot/tool/mqtt/authv5"
    body {
        clientid = "${clientid}"
        username = "${username}"
        password = "${password}"
        peerhost = "${peerhost}"
    }
    headers {
        "Content-Type" = "application/json"
        "X-Request-Source" = "EMQX"
    }
  }
]

# Webhook. Triggered when online/offline rules match.
bridges {
  webhook.fastbee_hook =
  {
    enable = true
    connect_timeout = 15s
    retry_interval = 60s
    pool_type = random
    pool_size = 8
    enable_pipelining = 100
    max_retries = 2
    request_timeout = 15s
    method = post
    url = "http://177.7.0.13:8080/iot/tool/mqtt/webhookv5"
    body = "{\"clientid\" : \"${clientid}\",\"event\" : \"${event}\",\"peername\" : \"${peername}\"}"
    headers = { accept = "application/json" "cache-control" = "no-cache" connection = "keep-alive" "content-type" = "application/json" "keep-alive" = "timeout=5"}
  }
}

# Rule for client online/offline and subscription events.
rule_engine {
  ignore_sys_message = true
  jq_function_default_timeout = 10s
  rules.fastbee_rule =
  {
    sql = "SELECT * FROM \"t/#\",\"$events/client_connected\", \"$events/client_disconnected\", \"$events/session_subscribed\""
    actions = ["webhook:fastbee_hook"]
    enable = true
    description = "Handle device online/offline events and topic subscription events."
  }
}
3.2 Configure through dashboard
a. Configure HTTP authentication
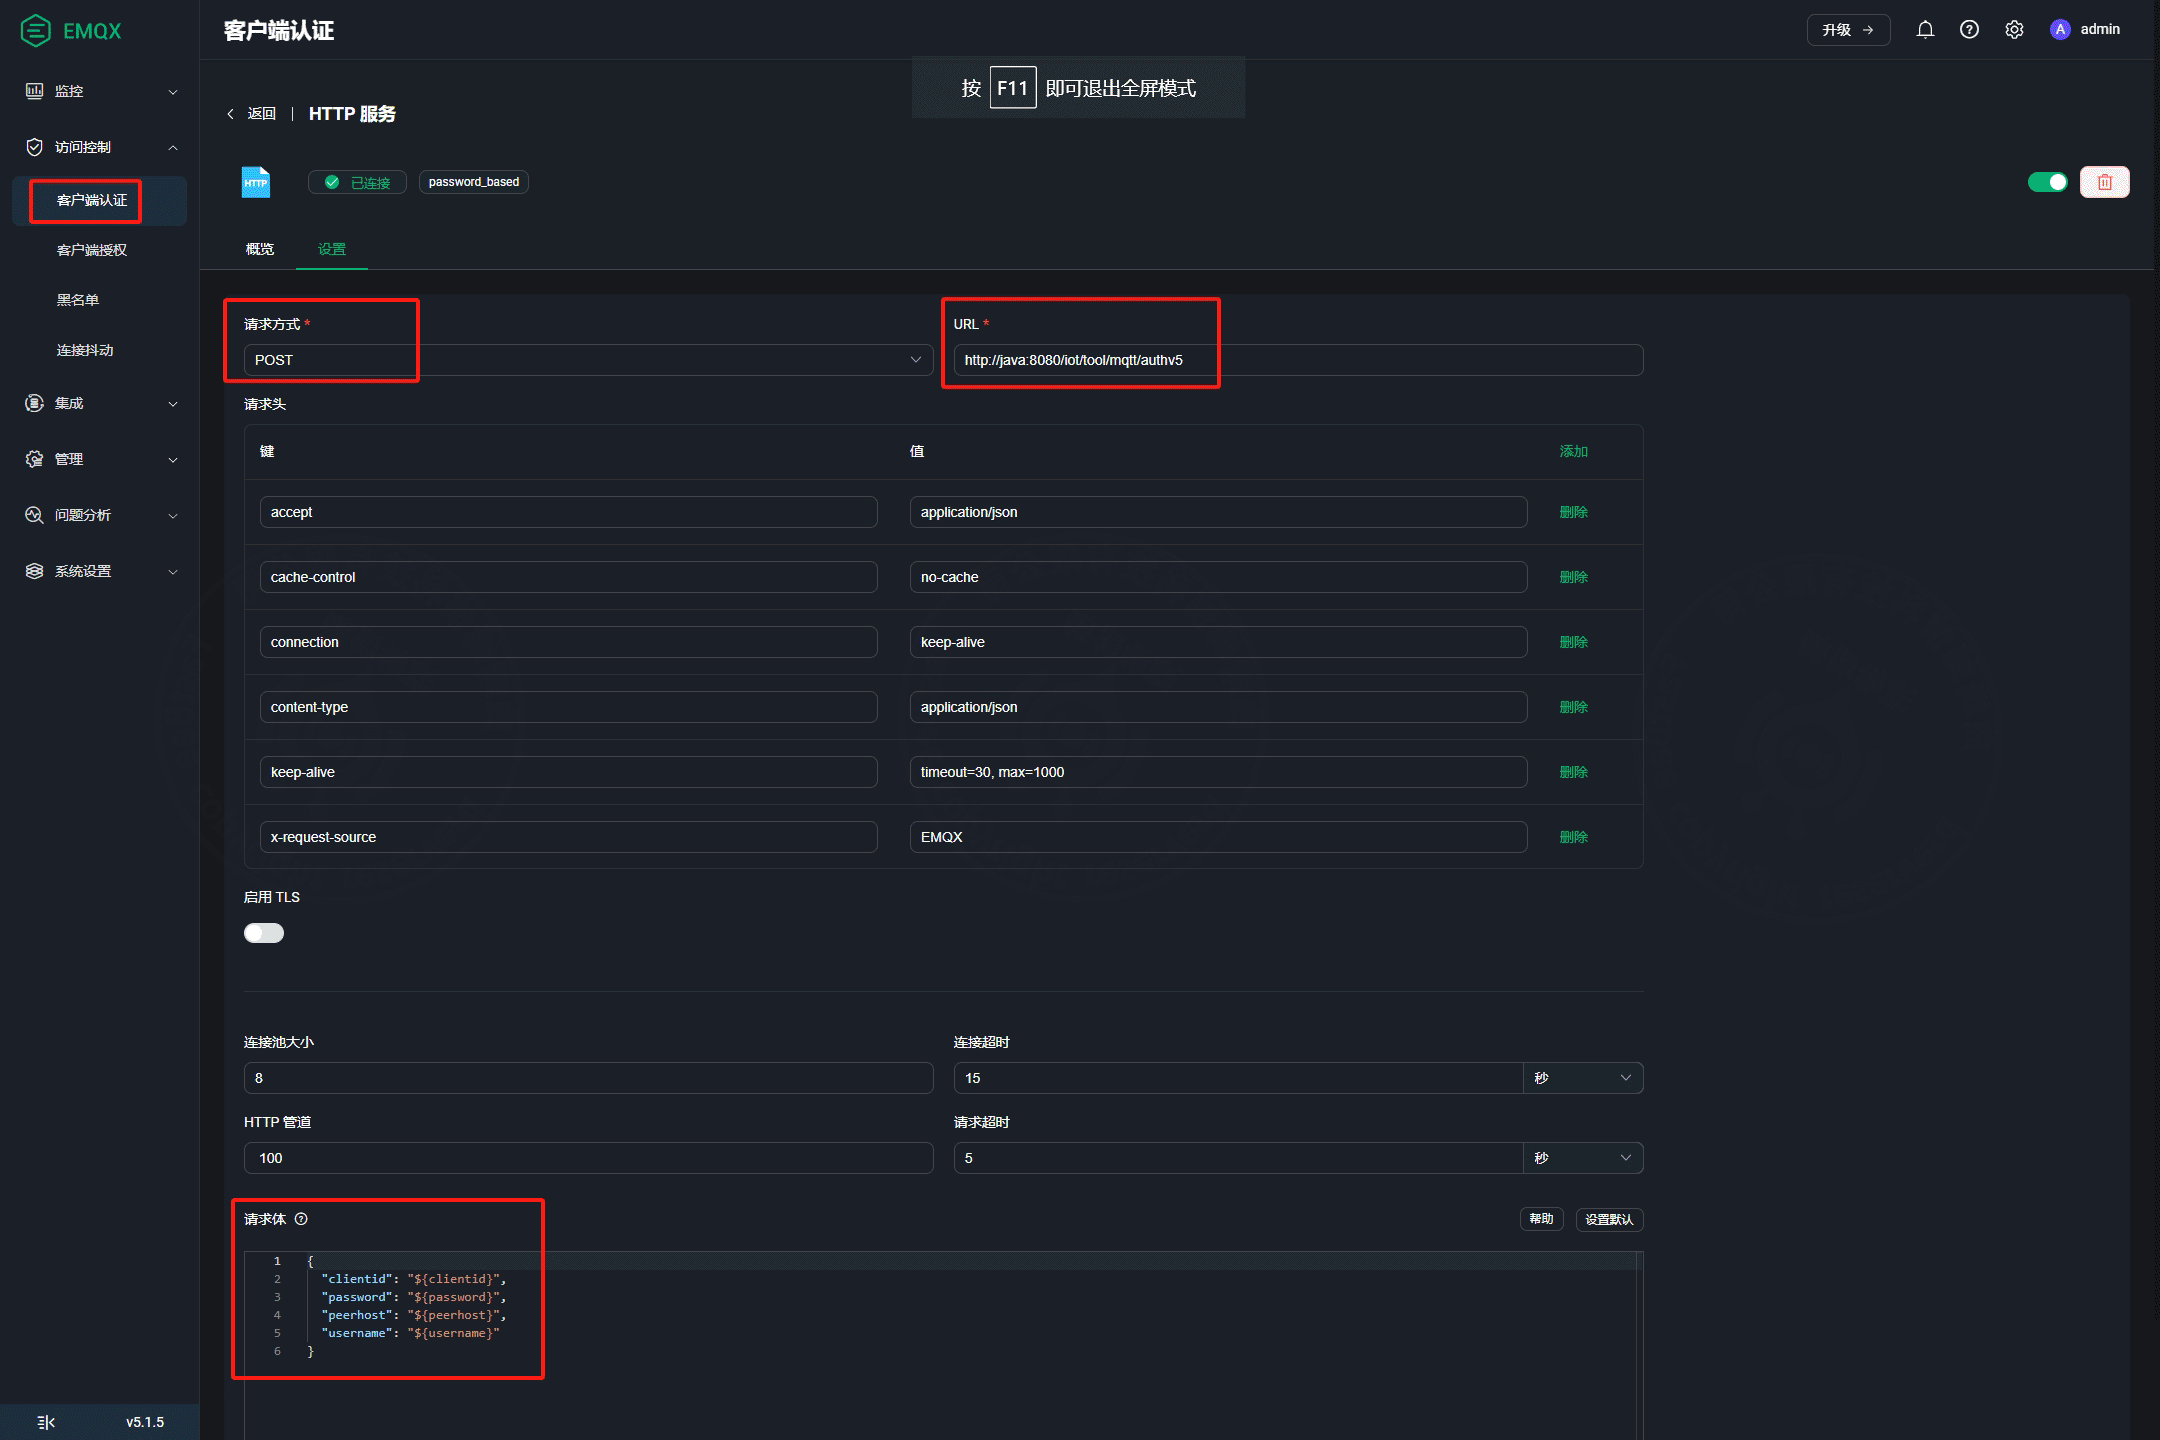
Request method: POST

Request URL:
http://177.7.0.13:8080/iot/tool/mqtt/authv5

The address can be an internal or public address, as long as EMQX can reach it.

Request body:
{
  "clientid": "${clientid}",
  "password": "${password}",
  "username": "${username}",
  "peerhost": "${peerhost}"
}
b. Configure Webhook
Create a data bridge first, then create a rule and associate the rule with the data bridge.
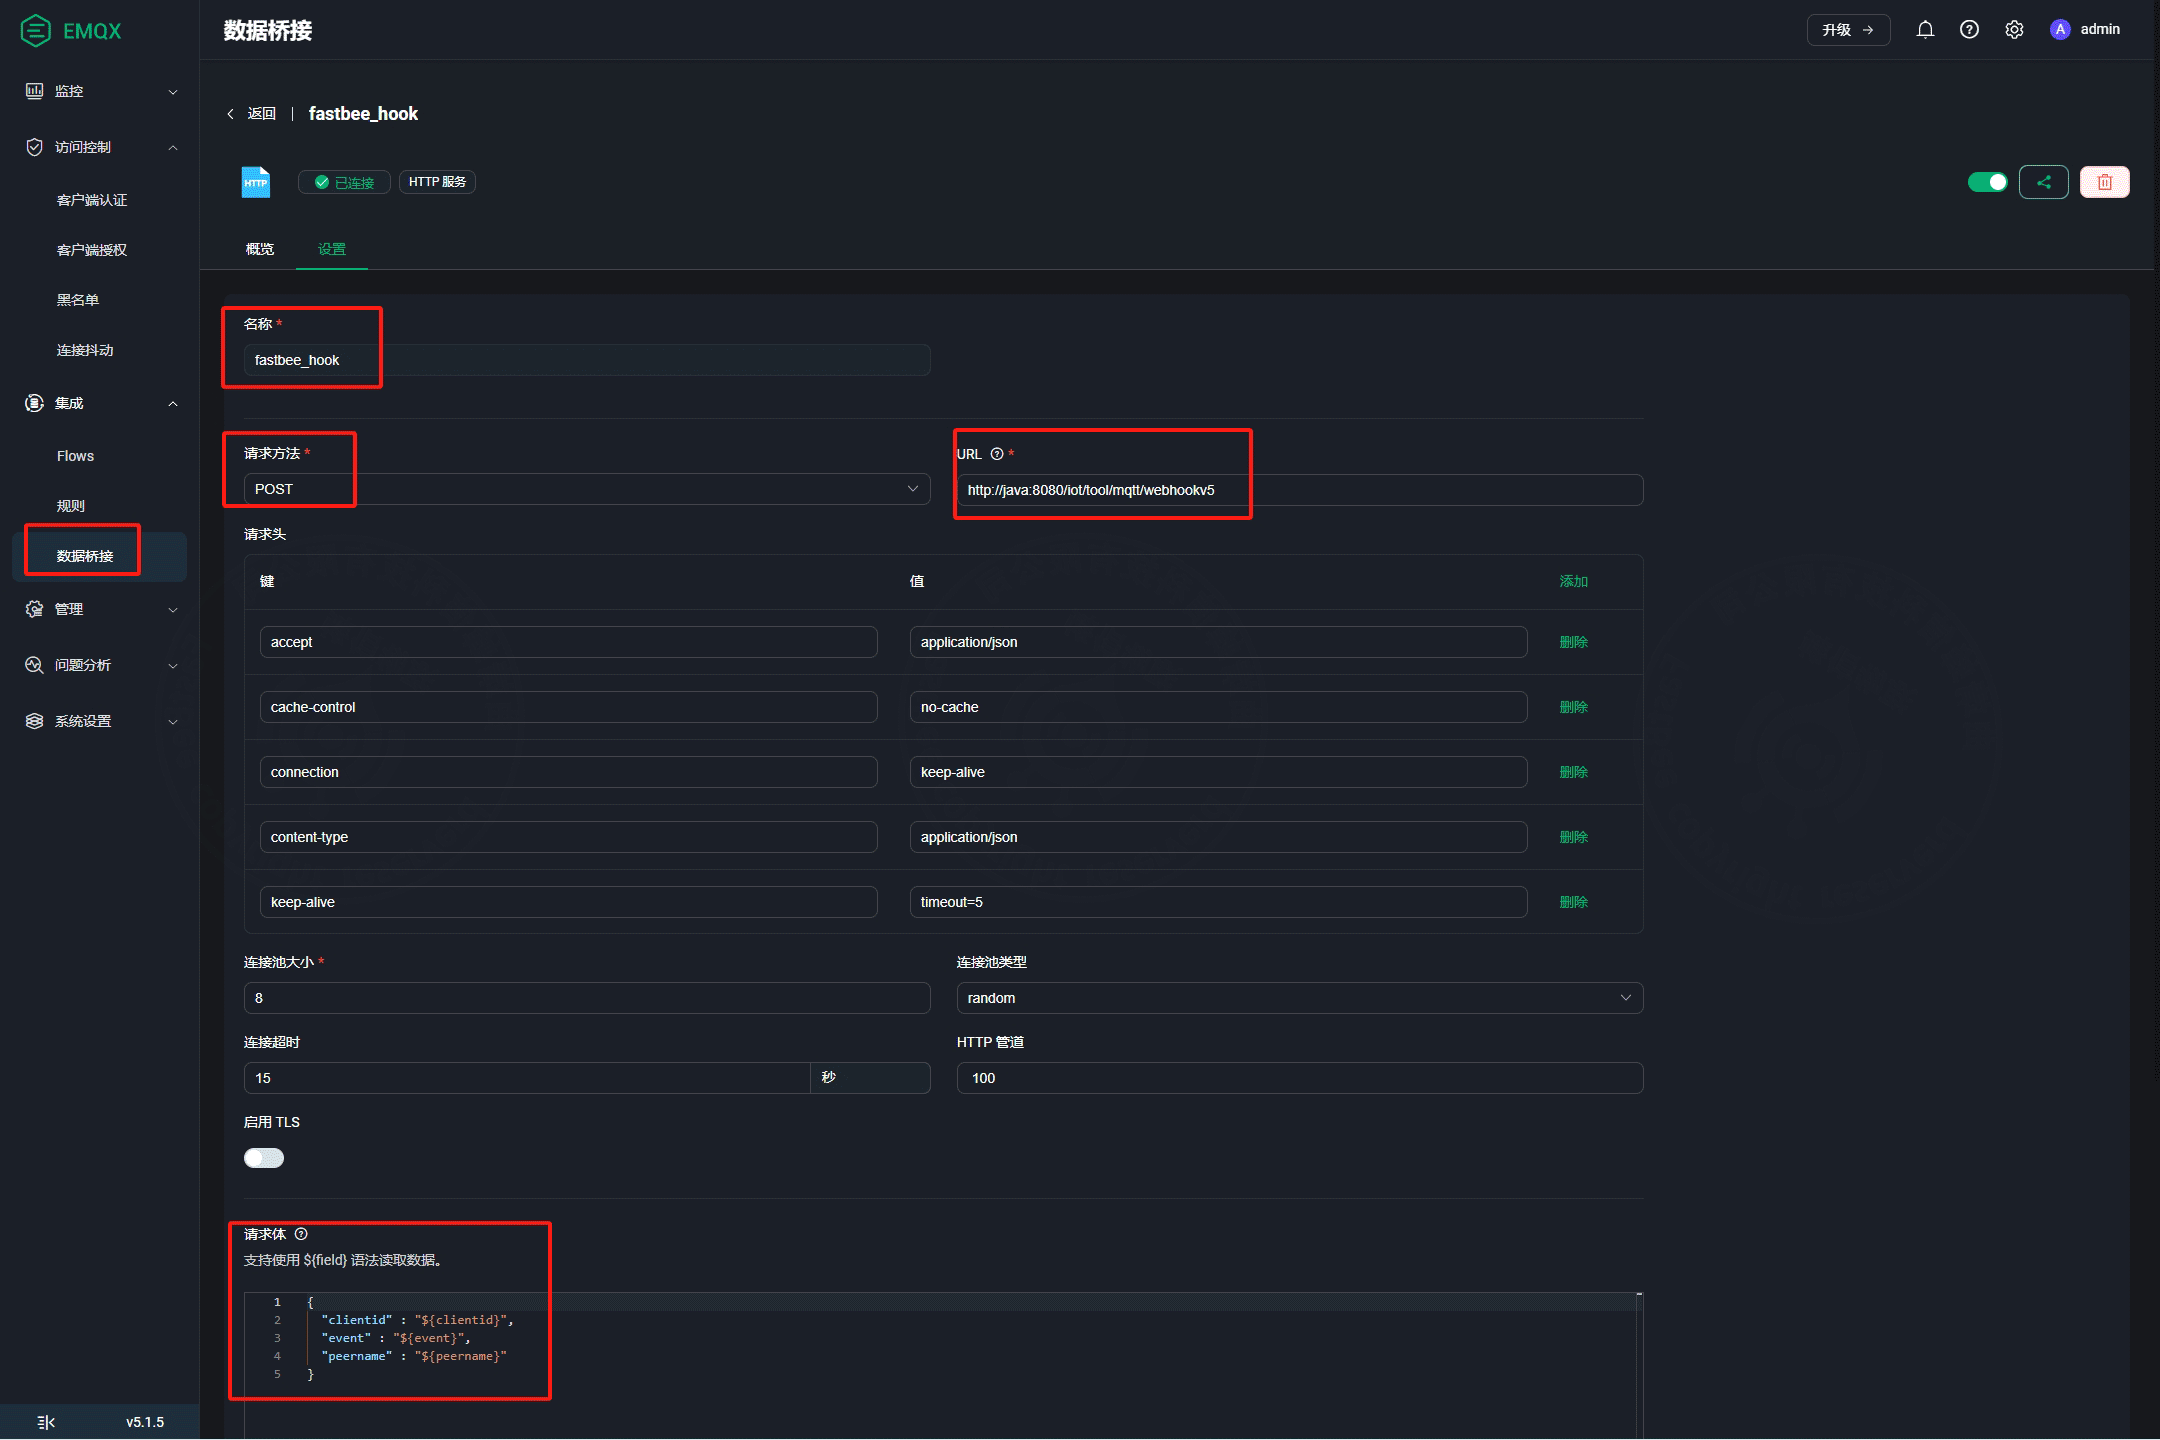
Data bridge name:
fastbee_hook

Request method: POST

Request URL:
http://177.7.0.13:8080/iot/tool/mqtt/webhookv5

The address can be an internal or public address, as long as EMQX can reach it.

Request body:
{"clientid" : "${clientid}", "event" : "${event}", "peername" : "${peername}"}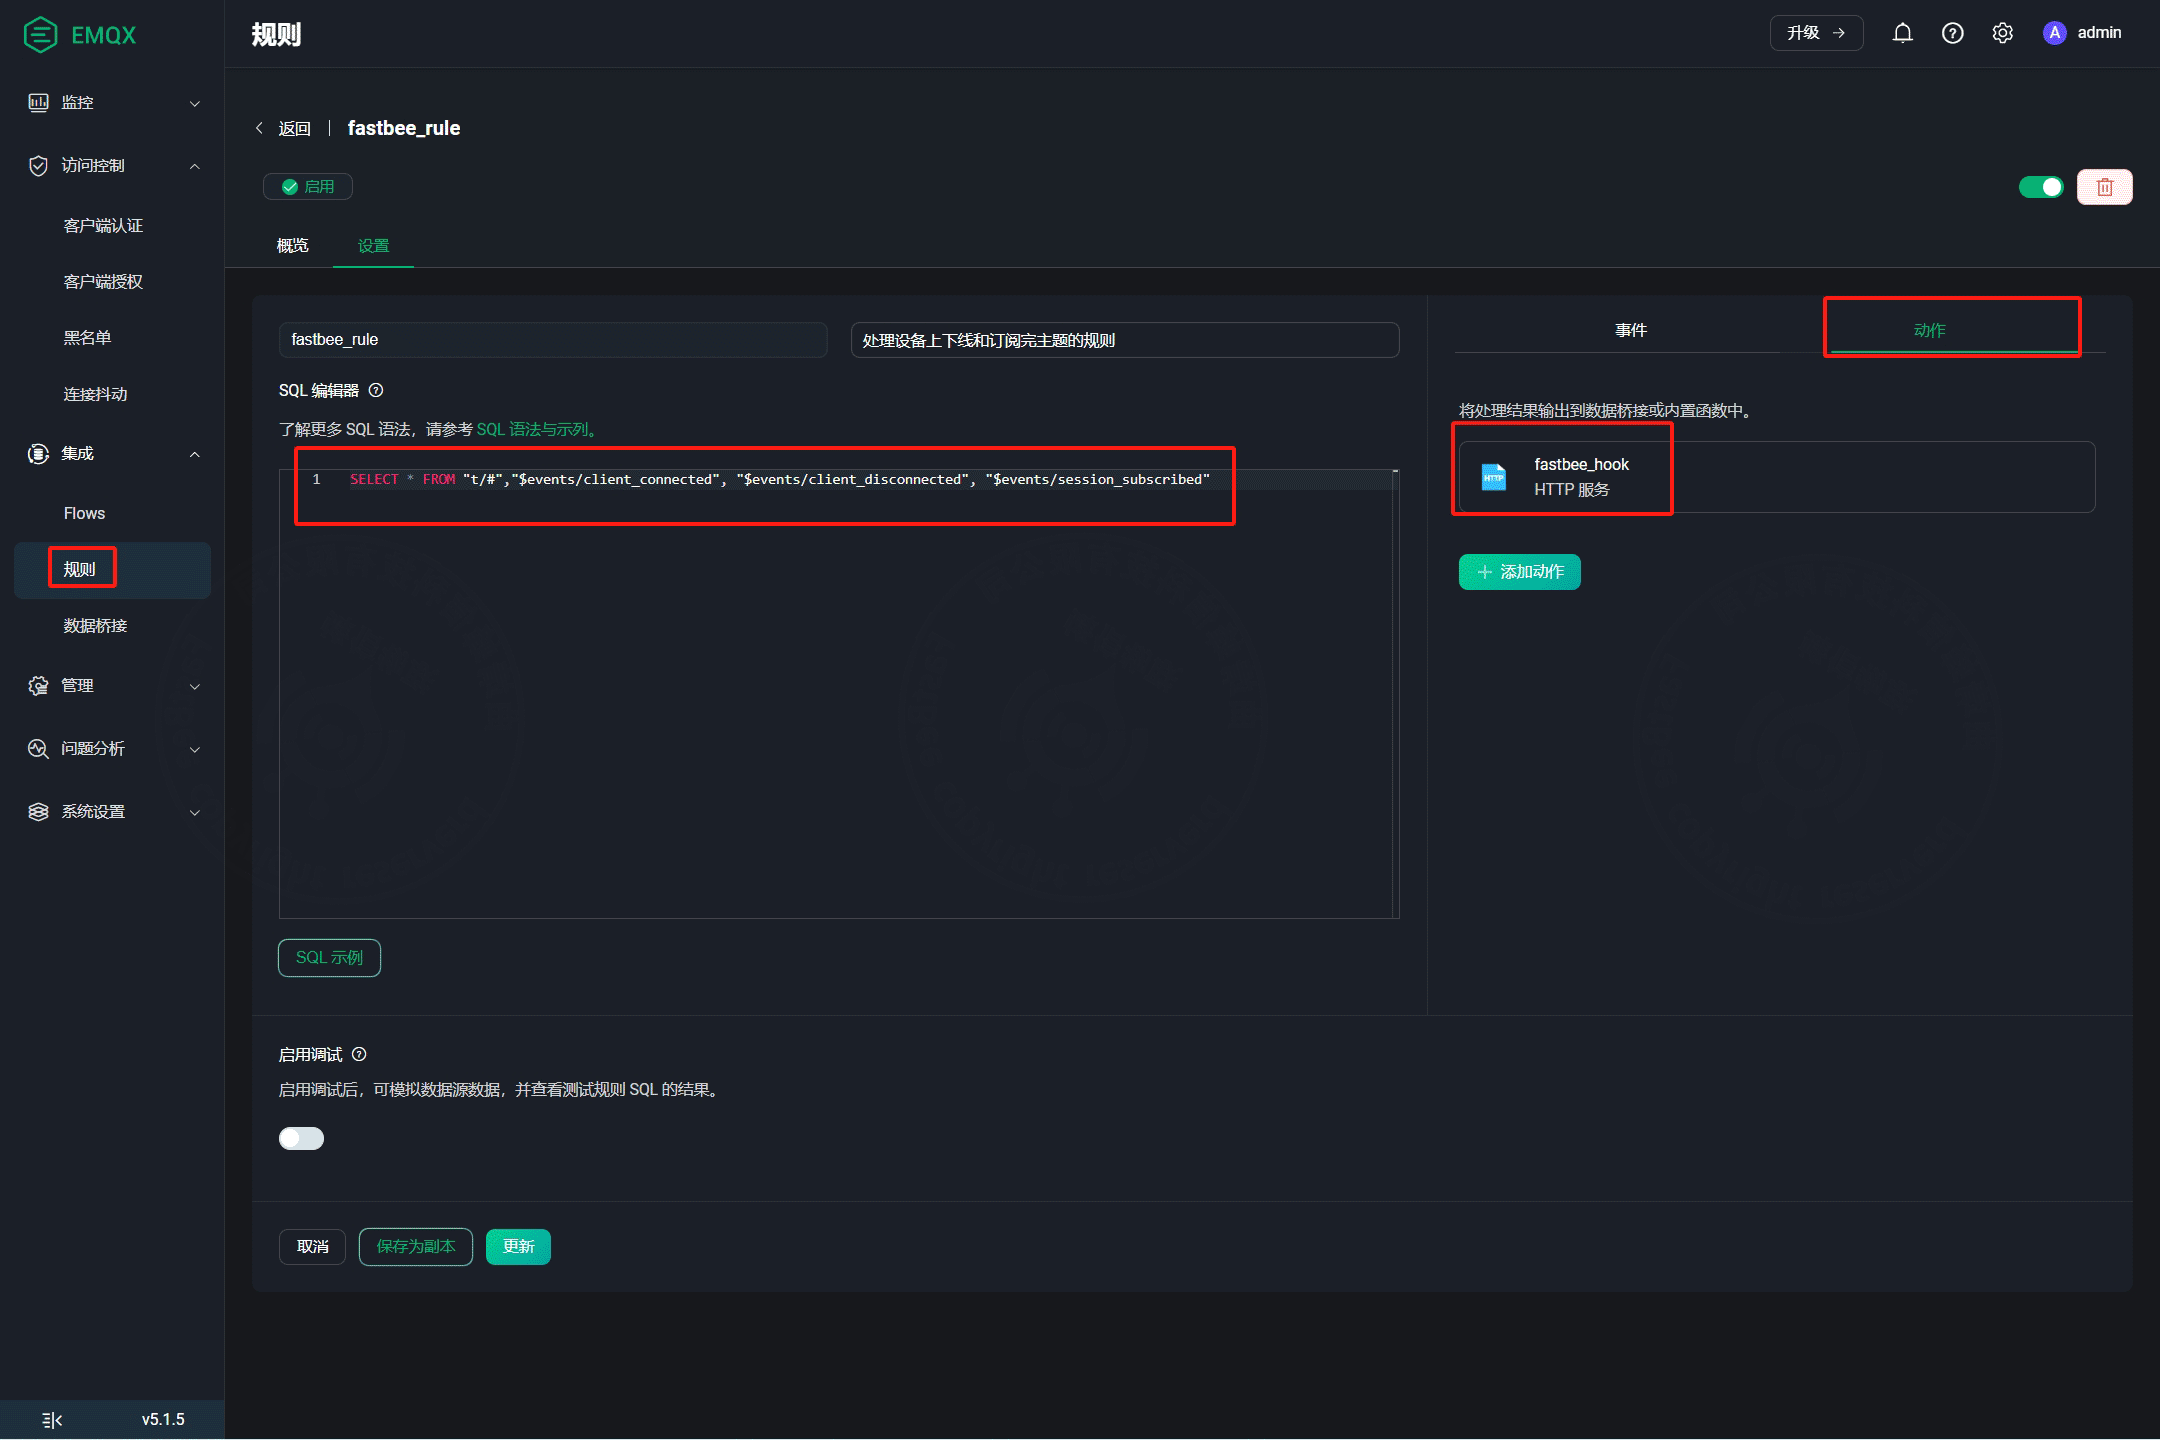
-- Rule name:
-- fastbee_rule
-- SQL editor content.
-- The events represent client connected, client disconnected, and session subscribed.
SELECT * FROM "t/#","$events/client_connected", "$events/client_disconnected", "$events/session_subscribed"
-- Action:
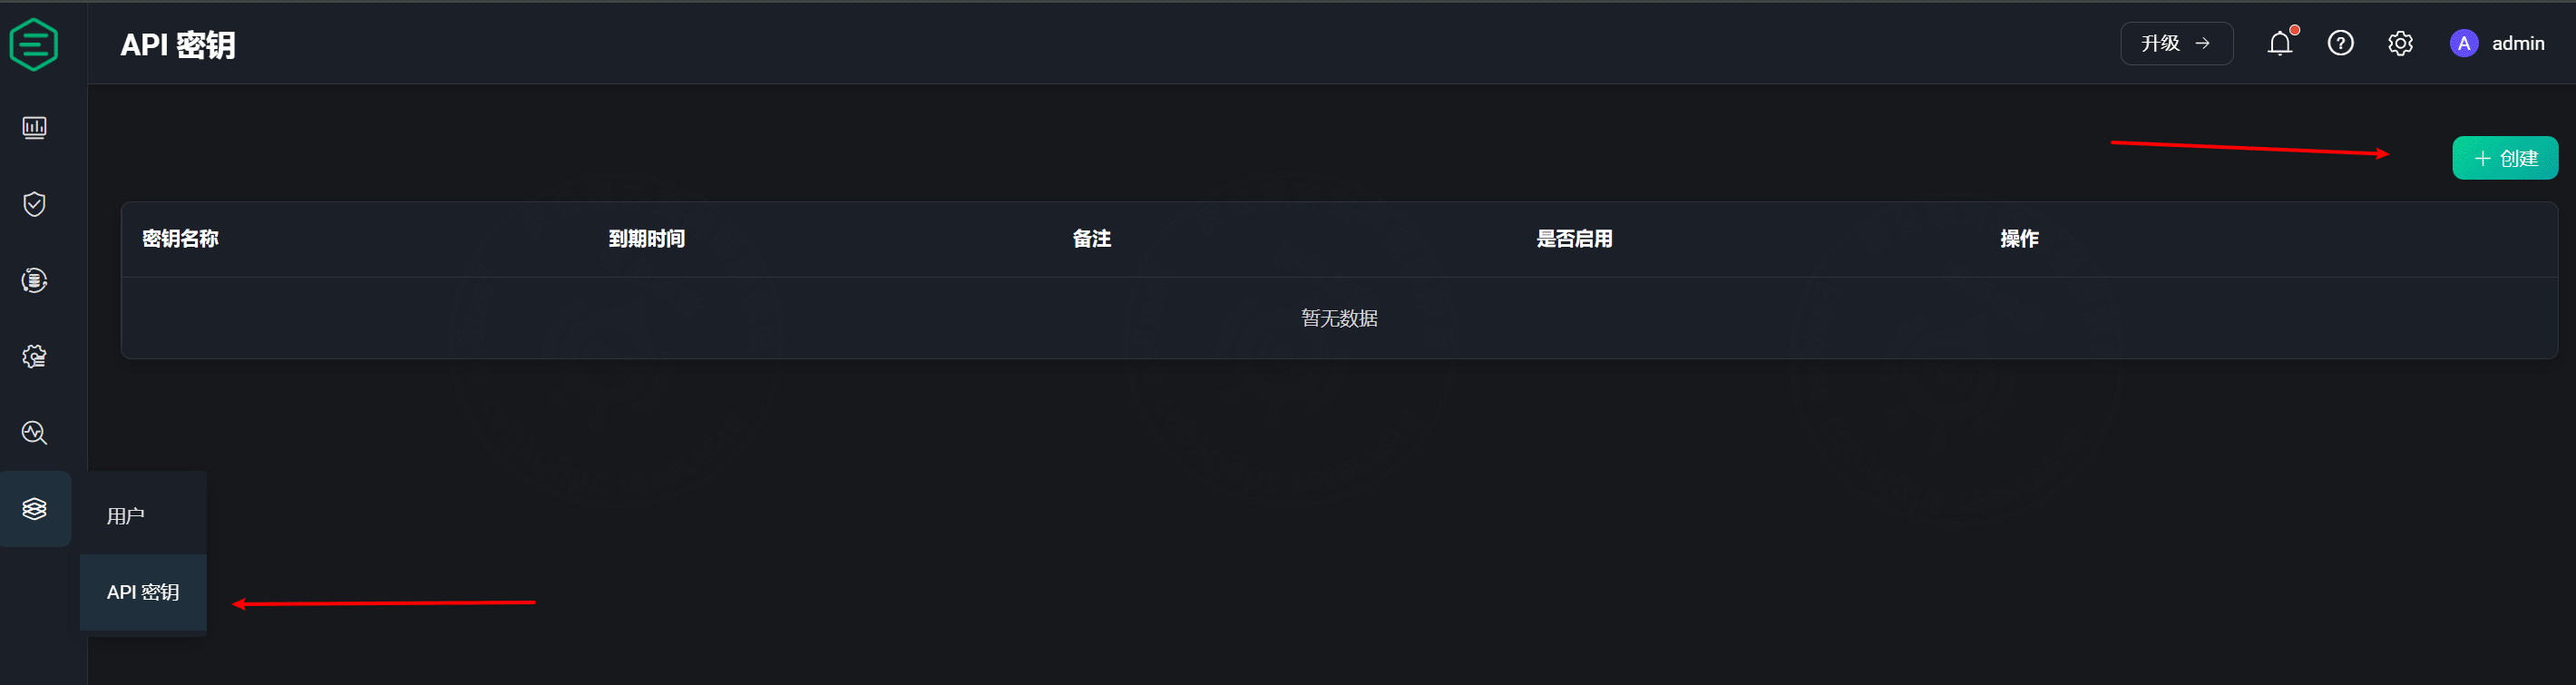
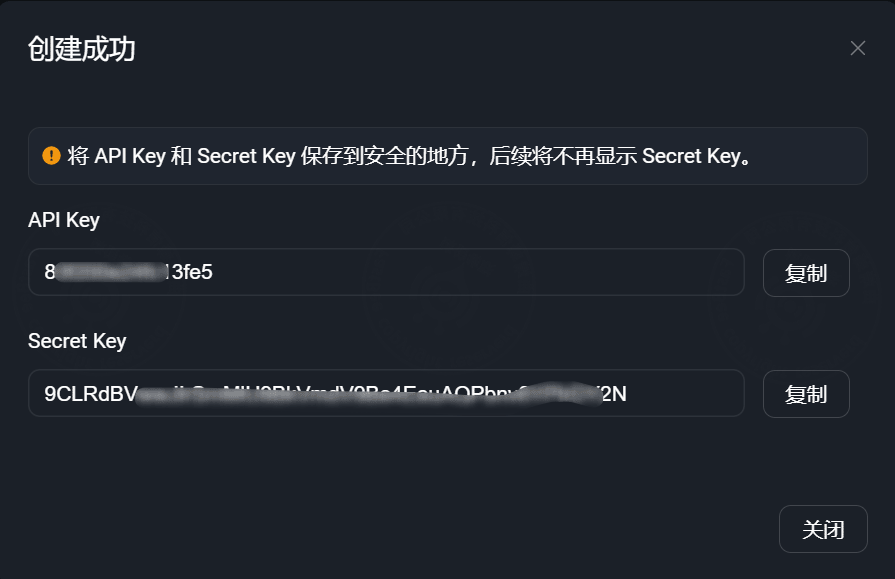
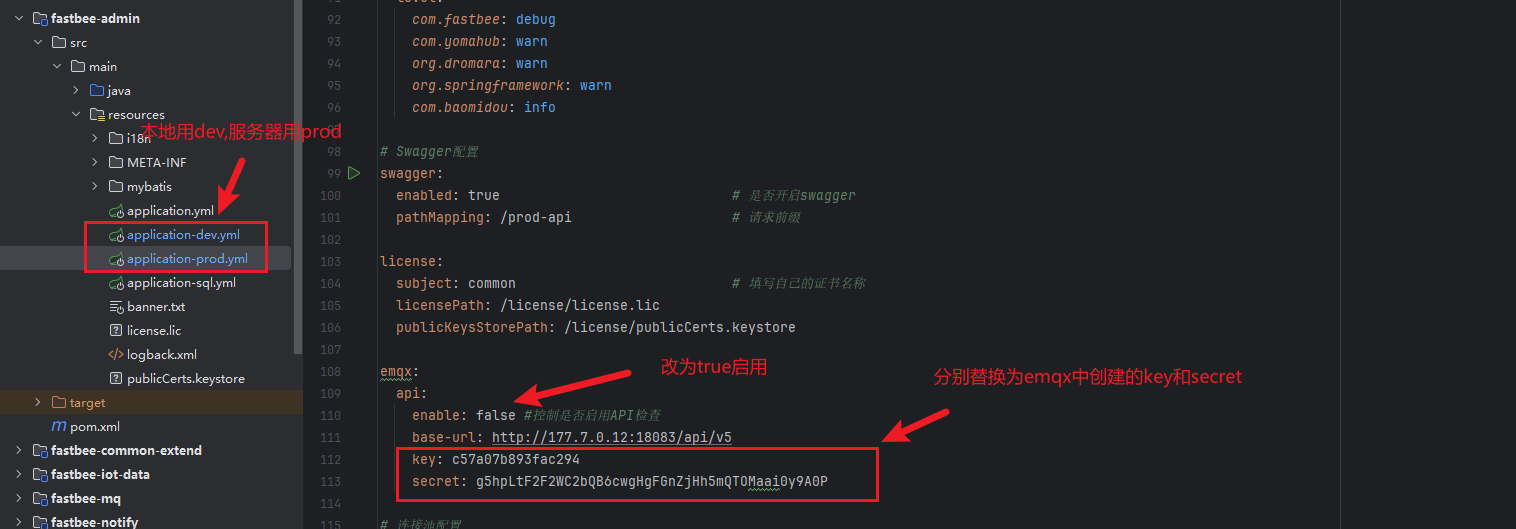
-- Select the created data bridge fastbee_hook.4. Confirm device online/offline status
To ensure accurate device online/offline status after the project starts, create an API key in the EMQX dashboard. Then add apiKey and apiSecret to application.yml and restart the Java service.